Equipment Used

We only really used two main pieces of camera equipment in our film opening: the dolly and the steadicam.

The Dolly

The dolly takes time to set up but, it is really easy to use. The dolly is commonly used in many films and we specifically used it for a through the wall shot (another technique seen a lot in cinema). The dolly created a wonderful effect for our film; below is the test footage for the dolly:

Steadicam

The second and final piece of equipment we used was the steadicam. We were really surprised at how easy the steadicam was easy to put together as well as to manoeuvre. The main action of the protagonist in our film opening is when he is walking so, we didn’t want to just have still, tripod shots of him walking. In order to show another skill, we decided to use the steadicam as it created a nice, smooth movement when we were following the actor. Here is the test footage for the steadicam:

Location Scouting

In order to prepare for our filming, my partner went ahead and looked for a the perfect location which would fulfil our story and script. The place we had in mind would be: open, isolated, spacious and also has a great view. The first place that came to my mind was Old Bolingbroke Castle – which is not very far from where I live. The location was accessible, free and it fitted the description. Before the production of the film opening, my partner went to see what the location looked like so, he filmed the walk around the castle. After viewing the location, we decided that this would be the best place to film and is therefore our filming location.

Equipment Testing : Steadicam

Another piece of equipment me and Adam wanted to try out was the steadicam. A steadicam is much like a dolly – it allows a smooth movement, even over irregular surfaces. Unlike the dolly, the steadicam does not have a track to it which means that it is held by a cameraman who moves it. It could be used to move around a room or to simply follow a character.

We tested the steadicam out to see its effectiveness as well as seeing if it needed to be used in the production of the film opening.

Here is our footage:

The steadicam was quite difficult to use but, it did create a nice, smooth movement when using it. However, in terms of it fitting our opening is a different matter. Personally, I feel like the steadicam would look better in an action film opening to make the audience feel like they are immersed in the action themselves. We want to create an eerie atmosphere with more “still” shots. However, we may consider using the dolly.

Equipment Testing : The Dolly

The dolly is a shooting platform often raised onto a track to create a smooth movement whilst filming. It is like a train track in which you put the tripod onto the trailer and it is pushed along. The dolly creates an even and neat movement; something a cameraman wouldn’t be able to do by holding the camera him/herself.

Since we have a dolly track available at school, we decided to test it out to see if it would be any use of us in our film opening. We took some test footage to see what the dolly can offer as well as how it can be operated.

We thought a sequence and technique we want to portray in our opening is a “through the wall shot”. This is something which we can easily do at our location as well as a technique which can show our filming ability. To show this technique, we set up the camera and dolly going into the computer room. The camera would start outside the room and the dolly would slowly work its way into the room, facing the wall.

Here is our footage:

We were quite pleased with how the footage came out and how easy it was to operate the dolly. Therefore we have decided to use the dolly in our production of the opening. The through the wall shot would create an atmospheric transition in the film against the foggy atmosphere. It will suit the theme and genre perfectly as well as showing our skill in filming techniques.

The Second Ident

After making the first ident, my partner set to work on the more complex and technical ident. For the first ident we just used Motion. For this one, we wanted to have a continuous animation as opposed to the first ident which just had the short glow effect of the tree. However, we did want a short effect at the end of the ident to make it look even more professional.

  1. The first thing Adam did was to get the footage of the waves crashing. The name we had in mind was ‘Tsunami Productions’ so, we wanted to have something which represented this.
  2. The next thing he did was to add the text (this was the “productions”) and he added a basic blur in effect to add some animation to the ident.
  3. The third thing my partner did was that we added another layer of text. This was underlaid over the video footage of the waves.
  4. Adam then added an image mask of the waves and then dragged the ‘Tsunami’ titles over the image mask. It created like a window effect since the waves were seeping through the text.

Screen Shot 2017-02-03 at 10.35.45.pngScreen Shot 2017-02-03 at 10.35.54.png


Screen Shot 2017-02-03 at 10.35.32.png

Here is the final product:

The First Ident

After completing research on idents and logos used in film openings, we began to use programmes like Pixelmator and Motion to create an ideal ident. We decided that we wanted to have two idents: one which is simple but still shows skills and the other one shall be more complex than the first. Using two idents show the range of skills we have in the “graphic” side of the project.

To get the outline of the drawing we wanted to use, my partner (Adam Zayee) started off with Pixelmator. He was provided with a graphic tablet to trace over a drawing of the tree. This was a lot easier than using a mouse as it created harsh lines and didn’t make the drawing look smooth. The programme was quite easy to navigate but, it did take quite a while to get the tree how we wanted it to look. After Adam had completed that, he exported the drawing to Motion.

ident-1-pic-1

The drawing of the tree in Pixelmator.

After Adam exported the picture to Motion he began to work on the actual animation. The process wasn’t too difficult as it was a lot like Final Cut Pro. We chose the title ‘Great Oak Pictures’ as it fitted well with the picture; it was also a memorable name. We played around with the effects and the different options Motion provided. We chose an effect which gave the tree a glow and then the glow would die down. We thought this looked simple but nice at the same time.

Ident 1 pic 2.png

In the sequence after the tree glowed, the name of the film company would come up. This was what we wanted our final product to look like. This is our finished (first) ident.


Our Animated Storyboards

Instead of just taking pictures of the storyboards normally, we wanted to show them in an animated form. With showing the storyboards on the screen with the duration in which each shot will be on the screen for, this shows what the film opening will look like. Adding the time of the idents which are about 12 seconds long together onto this animation, the storyboards should be almost two minutes long.

Here our animated storyboards:

https://vimeo.com/196117124

Storyboard Conventions

The next step in our pre production is creating a selection of storyboards to show what the visuals will look like. We have done a script which we can refer back to, to create the storyboards. The storyboards will help us during our filming process to make sure we get the best shots possible and in terms of preparation, it means the whole filming process won’t be very time consuming since everything has been prepared before hand. In order to create the best possible storyboards, we have searched the typical conventions of storyboards used in the film industry.

What is a storyboard? 

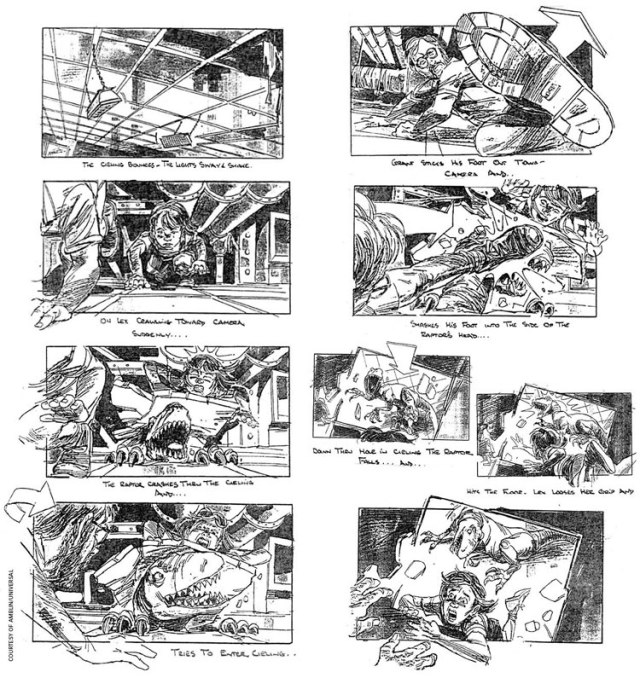
A storyboard is a graphic representation of how the film will unfold, shot by shot. It is referenced by the film makers in production and pre production to create the best film possible.

movie_storyboards_jurassic_park1.jpg

Storyboards for ‘Jurassic Park’

Storyboards have many conventions which are recommended to be considered to allow us to create a selection of useful and helpful storyboards. These include:

  • Camera Shot Distance (Long Shot, Wide Shot, Close Up, Extreme Close Up)
  • Camera Movement (Zooms, Pans, Tilts)
  • Camera Angles (High, Low, Flat)
  • Location (where the scene is set)
  • Who is in the scene (character name)
  • Type of action in the scene (arrows in the direction of movement, notes for the actor etc)
  • Description of what is happening (general info about the scene)
  • Types of transitions should be noted (dissolve, wipe, fade)
  • Notes for the sound (diegetic and non diegetic, narrative, off screen, voice over etc)
  • Timing of each shot (noted in the top corner of the storyboard box)

If we take these conventions into account, it will mean we have a helpful storyboard to look at whilst filming – meaning our filming won’t be clumsy or messy and it will be completed quickly and sufficiently.